
For my industry excersise brief i have chosen character design because its something that has always interested me and and its what i want to do for a career, i also found that the description of the characters in this brief had a lot of potential to grow and become something rather interesting!
Another reason i would like to do character design is that because of programme complications in the past with maya i have not really had the best chance to model and rig and i think its something i need to get good at especially when i go for a job in the industry!
I also think it would be amazing to have my own character made into a model.......< br>
What i want to achieve is something less obvious and something that only i can think of and create which is going to take a lot of my creativity but why not give it a go...
The character i have chosen for this project is "Wee Eck McGlone" because for me it sounded like the most fun and the most potential, i think its going to be hard finding a way of not making this stereotypical but im willing to give it a try, the description on the brief of this character is "“London Zoo’s long suffering head keeper sixty, bald, curmudgeonly, Scottish, fiercely patriotic and obsessive about sweeping up dung.”


[FIRST CONCEPTS SCANNED UP ON HERE]!!!!!!!
I found that these sketches of the character were far to stereotypical and that it seems i am so focused on the requests that the brief WANT us to put in than i am in what they HAVENT put in, and i think thats the angle i got to look at if i want to create something truly original!LESS OF THIS:


Right, Trying again!


MAYA TUTORIAL-Using the Expression Editor
Today (Wednesday 3rd November) we was taught the importance of scripting in maya, sending commands in code form to tell an object to do a certain thing, this can be useful for things like if im animating a car and i want the wheels to rotate in a constant and fluent manner or if i want to animate a propeller on a helicopter, the Expression editor ensures that your object moves to the exact specifications of your equation.For Example

Week 3:
This week i am hoping to do a lot more research and worm on this project than the previous weeks as i feel as though im slipping on this part of the course, lately, my main concern has been the team excersises with Jared and although ive enjoyed both projects equally, my time planning for the projects haven't been great. This week im hoping to do an execeedingly large amount of research maybe some research on the components of a hoover, for my characters foot, maybe some research on how the hoover operates itself? and most importantly by the end of the week i am hoping to atleast be mid-way through my character modelling!
The Hoover:
Alas i have come to a boring part of this project, in choosing the character i thought was the best, (image below) i came to the conclusion that i would have to research hoovers....HOOORAYYY!! although this seems like its the most annoyingly stupid thing to research i think its essential to my characters design stages, so lets get this over with!!


Beginning The Modelling Process:
First off, i have to map out my character in maya so i can get the shape and proportions exact! so the first stage would be to create a front and side view in the T-pose so that we can import this onto an image plane! The front and side poses are shown below.


First stage of modelling:


This is the beginning stages of my modelling process, so far so good....for an amateur , its taking me a while to work out all the little kinks, but if i flick through enough tutorials i think i can get this model looking pretty decent by the end of next week :)
Week 4:Okay so yet again week 3 was pretty slow, but my blog seems to be taking shape and so does my model, its the first day of the week (Monday 15th November) and i have the day off of college so i've decided to continue with a bit more of my modelling and maybe move onto Jared unit a little later,
Making progress... 


Kierons suggestions were that i make my layout more neat and that i show more progression, as you can see i've just changed my layout and showed a lot more pictures and annotated a lot more in what im doing, i valued Kierons advice because it does'nt only apply to this project but also to my future career and the future of this blog, if its not clear to some people than it might not be clear to others and that could cost me heavily when looking for a job in industry.

Russell's advice wasn't really critical, and he gave me a pretty generous mark, although i am not complaining i would much rather have a harsh critic than a nice one, the only advice he gave to me was to do more tutorials and upload them to the blog both students gave me a B but im still gonna work as though I've been predicted a U :)


RIGGED:
Okay so this was my first attempt at rigging EVER and to my amazement it actually went rather well, alex only asked for a basic skeletal structure just so we can put it in a pose, so i looked online for some tutorials and managed to find one which guided me through!
http://www.wonderhowto.com/how-to-rig-character-maya-for-beginners-196606/
Okay so here is my outcome, the character moves but only basic!
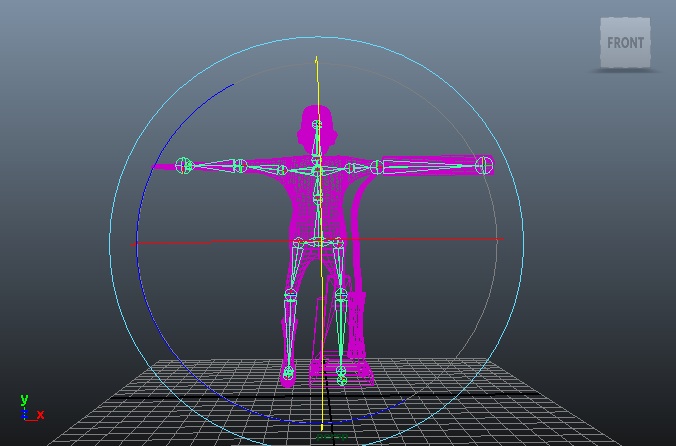
so yeah, this is the rig of my character, nothing special! but it works so i'm happy!
STRIKING A POSE:
A basic pose to show the rigging was successful and to make things more interesting for the 3-d printer!


i like this pose because its the sought of pose an old man would have, his back is slightly arched, and his arms aren't relaxed all the way down, he looks stiff which is what old men generally look like!
netfabb is a programme in which you can import your model as an .obj file and correct any problems and alter the specifications of your model to make it look good as a 3-d model!

This is what my character looks like when uploaded as an .obj in Netfabb i'm assuming that the pyramid is in fact what the model will be made out of, the red parts are the problem, i've had word that the netfabb website has a correction programme which will correct everything for you so as time is of the essence i am going to do that and then i can begin texturing!

so this is on the website and you upload you .obj to this part
and then with any luck......

BINGO! and you can download this file and send it away to the 3-d printer guy!
i will upload a photo when my figure is printed CANT WAIT!
LETS GET TEXTURING!
Okay this was probably the hardest part for me, finding textures that didn't look flat was a task, below is my final result, i tried my best and i don't think its completely bad, but if this part of the project has told me anything its how difficult it is to texture, its one of those things thats essential to go back to!


Okay so as i previously said, my texturing isn't great, i tried to do as much as possible but some things such as the hoover just looked better if i added a standard lambert or blinn i don't know weather or not we're aloud to do that but fingers crossed!
MAKING THE MODEL LOOK LIKE CLAY:
I actually did this before the previous texture (above) however, ialso had difficulties with this texture, i did want to make fingerprints and creases and really give it that clay effect, but it did turn out to look rather inaccurate, i did try my best but time is too short, this is something im going to have to go back to or it will drive me up the wall! so here is my final result for the clay:


These are my final clay models i gotta say when i was texturing it i thought it looked a lot worse but i think its not bad, it looks like if i were to make a model out of clay haha!
but im still gonna go back and attempt to texture this a lot better! now just waiting for that figure to be printed!
turn tables of my character:
There not that clear as the camera had to be really far back to get the whole model in shot but hopefully you can see clearly on the pictures!
PROBLEM
I spoke to jake durrant (3-d printing guy) and he told me that he's been really busy so it will be a while before i get my model, i sent it last thursday and he said hes going to try and look at doing it later today (deadline day) i should have been more organised i thought friday would've been fine but now maybe it will teach me a lesson that i shouldn't assume things so close to deadlines!

Finally after weeks of trying my model has been printed :D unfortunately there mut have been something wrong with my characters body so instead i ended up printing the head! heres a video of what my head looks like!